
Financials for Jira uses a two-layer permission model. The first layer is managed at the Jira global level by a Jira administrator and controls who can access and administer the app itself. The second layer is managed at the project level by a Financials Administrator and controls what each user or group can do within a specific project.
Both layers must be configured correctly for a user to perform any action in the app.
7.1 Global permissions
Global permissions are configured in Jira's system settings and apply across the entire Financials for Jira app - not just a single project. A Jira administrator must grant these permissions to the appropriate users or groups.
Path: ⚙️ Jira Settings → System → Global permissions
There are three global permissions:
|
Permission |
Description |
|---|---|
|
Financials for Jira App Access |
Grants the ability to open and use the Financials for Jira app. Any user who needs to view or interact with the app must have this permission. |
|
Financials for Jira Administrator |
Grants the ability to configure the Financials for Jira app, including App Settings (Categories, Groups, Companies, Statuses) and global permission management. |
|
Financials for Jira Create New Project |
Grants the ability to create new financial projects within the app. |
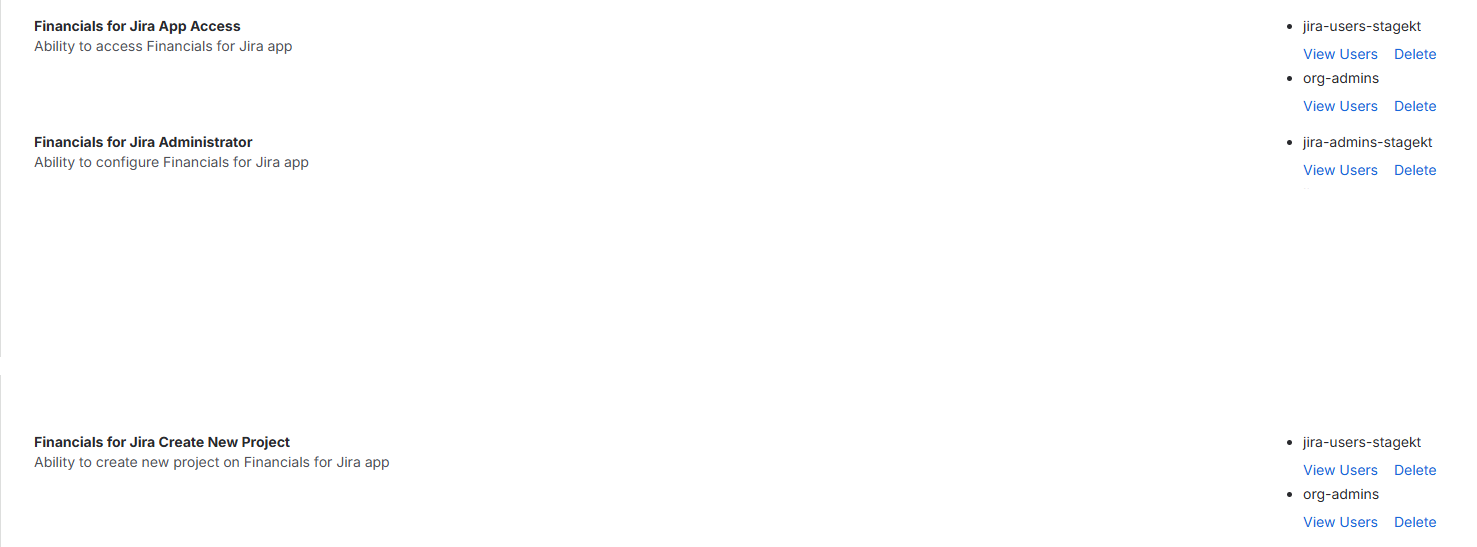
A user who has not been granted Financials for Jira App Access will not be able to open the app at all, regardless of any project-level permissions they may have.
7.2 Project-level permissions
Project-level permissions are configured within each individual project's Settings → Permission tab. They are managed by any user who holds the Financials for Jira Administrator permission for that project.
Path: Projects → [Project Name] → Settings → Permission
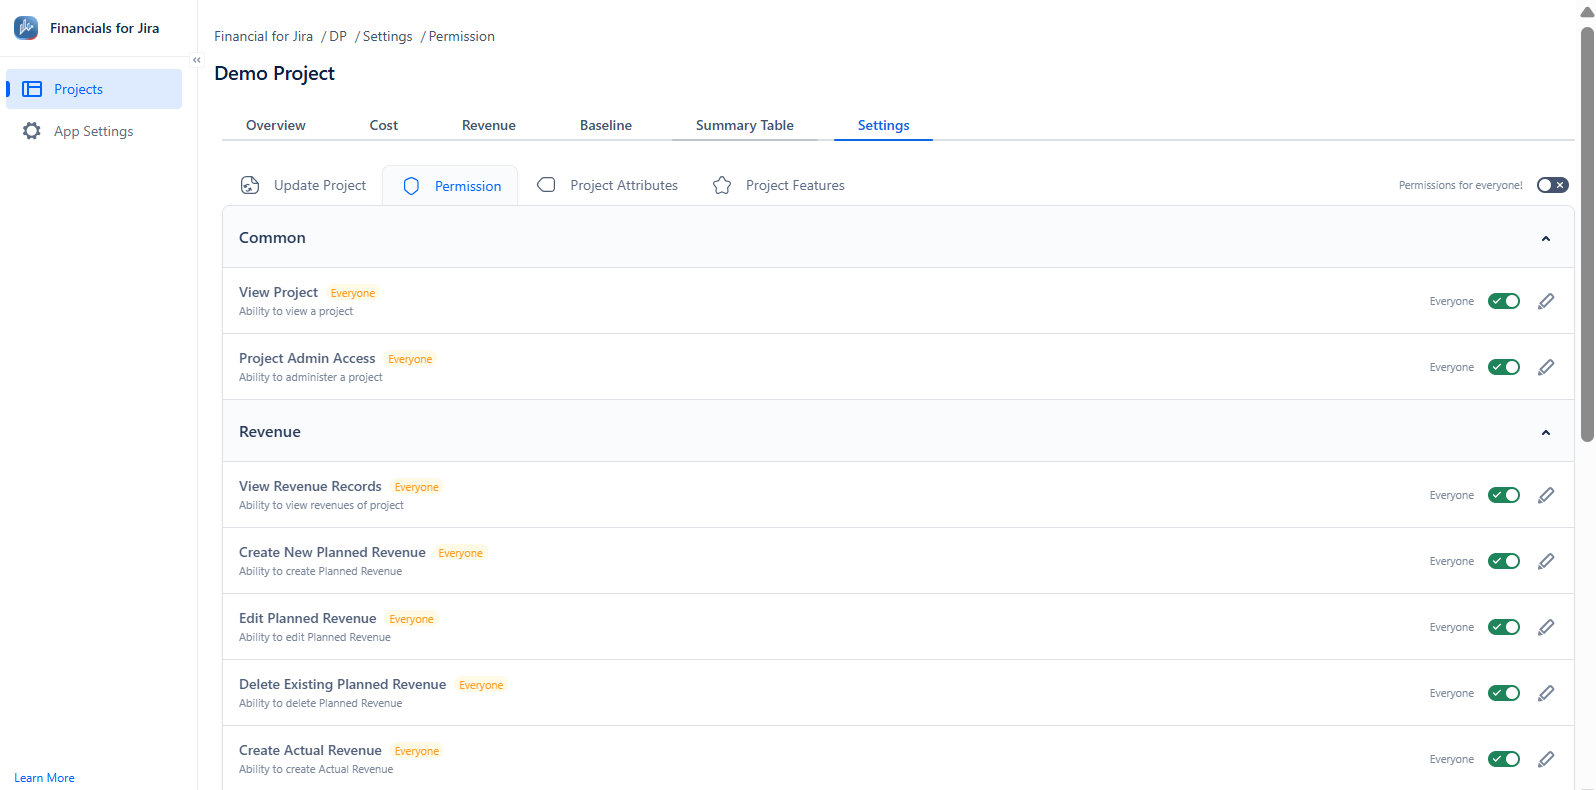
Permissions for everyone toggle
At the top-right of the Permission tab, there is a Permissions for everyone! toggle.
|
Toggle state |
Behaviour |
|---|---|
|
ON (enabled) |
All permissions in this project are granted to every user who has app access. Individual permission assignments are ignored. |
|
OFF (disabled) |
Permissions are enforced individually - each permission must be explicitly assigned to specific users or groups. |
The "Permissions for everyone" toggle is useful during initial setup or for internal projects where all team members should have full access. For projects with sensitive financial data, keep this toggle OFF and configure permissions explicitly.
Permission groups
Project-level permissions are organised into three groups: Common, Revenue, and Cost.
Common
|
Permission |
Description |
|---|---|
|
View Project |
Ability to view a project and its financial data. |
|
Project Admin Access |
Ability to administer the project, including managing its settings and permissions. |
Revenue
|
Permission |
Description |
|---|---|
|
View Revenue Records |
Ability to view the revenue records of the project. |
|
Create New Planned Revenue |
Ability to create new planned revenue entries. |
|
Edit Planned Revenue |
Ability to edit existing planned revenue entries. |
|
Delete Existing Planned Revenue |
Ability to delete planned revenue entries. |
|
Create Actual Revenue |
Ability to create actual revenue entries. |
|
Edit Actual Revenue |
Ability to edit existing actual revenue entries. |
|
Delete Actual Revenue |
Ability to delete actual revenue entries. |
Cost
|
Permission |
Description |
|---|---|
|
View Cost Records |
Ability to view the cost records of the project. |
|
Create New Planned Cost |
Ability to create new planned cost entries. |
|
Edit Planned Cost |
Ability to edit existing planned cost entries. |
|
Delete Existing Planned Cost |
Ability to delete planned cost entries. |
|
Create Actual Cost |
Ability to create actual cost entries. |
|
Edit Actual Cost |
Ability to edit existing actual cost entries. |
|
Delete Actual Cost |
Ability to delete actual cost entries. |
Assigned users indicator
Each permission row displays the currently assigned audience next to the toggle:
|
Label |
Meaning |
|---|---|
|
Everyone (orange badge) |
The permission is currently granted to all users with app access. |
|
A group or user name |
The permission is restricted to the listed group(s) or user(s). |
7.3 Editing a permission assignment
To edit a permission assignment:
-
Open Projects → [Project Name] → Settings → Permission and find the permission.
-
Click the pencil icon (✏️), then use the User or Groups tab to search for and select users or groups.
-
Click Save to apply the changes, or Cancel to discard them.
7.4 How the two layers interact
Think of the two permission layers as a gate and a room. The global permission is the gate - without it, a user cannot enter the app at all. The project-level permission is the room - it controls what the user can see and do once they are inside.
|
Scenario |
Result |
|---|---|
|
User has App Access (global) + View Project (project) |
✅ Can open the app and view the project. |
|
User has App Access (global) but no project-level permissions |
❌ Can open the app but cannot see or interact with the project. |
|
User has project-level permissions but no App Access (global) |
❌ Cannot open the app at all. |
|
User has App Access + View Revenue Records but not View Cost Records |
✅ Can see the Revenue tab. ❌ Cannot see the Cost tab. |
|
User has View Project but not Create New Planned Revenue |
✅ Can view revenue records. ❌ Cannot add new planned revenue entries. |
7.5 Recommended permission setup
The following is a recommended starting point for most teams. Adjust group names to match your organisation's Jira groups.
|
Role |
Global permissions |
Project-level permissions |
|---|---|---|
|
Finance Admin |
App Access, Administrator, Create New Project |
All permissions |
|
Project Manager |
App Access, Create New Project |
View Project, View Revenue Records, View Cost Records, Create/Edit Planned Revenue, Create/Edit Planned Cost |
|
Finance Analyst |
App Access |
View Project, View Revenue Records, View Cost Records, Create/Edit/Delete all Revenue and Cost entries |
|
Read-only Stakeholder |
App Access |
View Project, View Revenue Records, View Cost Records |
Always assign permissions to groups rather than individual users where possible. This makes it easier to onboard new team members and maintain consistent access as your team changes.